Our team have been working hard over the past few months to build and release a range of new actions for Encodian Flowr, our Power Automate Connector. The first two new actions released introduce the capabilities to add both text and image watermarks to Microsoft Word documents. This post provides a basic guide for using the new actions and a link to an instructional YouTube video. The following two scenarios are covered within this post:
- Add a text watermark to a Word document with Power Automate
- Add an image watermark to a Word document with Power Automate
Add a text watermark to a Word document with Power Automate
To focus on how to utilise the Encodian ‘Add Text Watermark to Word‘ action we’ll create a very simple flow that adds a text watermark to a Word document stating ‘Uncontrolled Copy’ prior to sharing the Word document via email.
1. Navigate to a SharePoint document library and click ‘Automate > Power Automate > Create a Flow‘

2. Click ‘Show more‘

3. Select the ‘Complete a custom action for the selected file‘ template

4. Click ‘Continue‘

5. Change the name of your Flow; the name used will appear on the SharePoint Power Automate context menu.

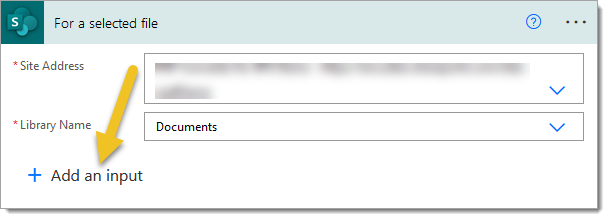
6. We also need to request an email address from the user invoking the flow so we can dynamically send the selected document to the target recipient. On the SharePoint ‘For a selected file‘ action click ‘Add an Input‘

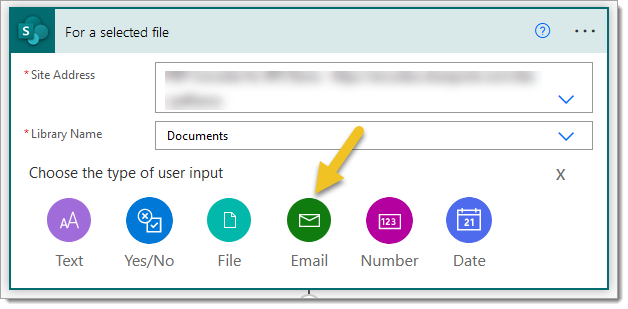
6.a. Select ‘Email‘

7. Next, add a SharePoint ‘Get File Content‘ action to retrieve the file
7.a. Site Address: Set as per the trigger actions value
7.b: File Identifier: Select the ‘Identifier‘ property provided by the ‘Get file properties‘ SharePoint action

For a production scenario logic should be added to the flow at this stage to validate whether the selected document is a Word document prior to attempting to add the watermark but for simplicity we’ll assume we are only working with Microsoft Word documents.
8. Add an Encodian ‘Add Text Watermark to Word‘ action
8.a. Filename: Select the ‘File name with extension‘ property provided by the ‘Get file properties‘ SharePoint action
8.b. File Content: Select the ‘File Content‘ property provided by the ‘Get file content‘ SharePoint action
8.c. Text: Enter ‘Uncontrolled Copy‘, noting any text value, Power Automate dynamic data or Power Automate expression can be used instead.
8.d. Orientation: Select ‘Diagonal‘

9. Optionally review the advanced settings to control the font configuration and watermark transparency

10. Add a Office 365 Outlook ‘Send an email (V2)‘ action
10.a. To: Select the ‘Email‘ property provided by the SharePoint ‘For a selected file‘ trigger action
10.b. Configure the Subject and Body properties as required
10.c. Click ‘Show advanced options‘

10.d. Attachments Name – 1: Select the ‘Filename‘ property property provided by the Encodian ‘Add Text Watermark to Word‘ action
10.e. Attachments Name – 1: Select the ‘File Content‘ property property provided by the Encodian ‘Add Text Watermark to Word‘ action

11. The flow is now complete and ready for testing

12. Navigate to your SharePoint library to test the flow

13. Post execution of the flow with your email and document attached


Add an image watermark to a Word document with Power Automate
Building upon the previous example, let’s update the flow to remove the Encodian ‘Add Text Watermark to Word‘ action and replace it with the Encodian ‘Add Image Watermark to Word‘ action to add an image watermark as opposed to a text watermark.
1. Remove the Encodian ‘Add Text Watermark to Word‘ action
2. Add a SharePoint ‘Get file metadata‘ action to obtain the properties of the image which you would like to add to the document as a watermark
2.a. Site Address: Set to the SharePoint site containing the target image file
2.b. File Identifier: Select the target image file

3. Add a SharePoint ‘Get file content using path‘ action to obtain the image file which you would like to add to the document as a watermark
3.a. Site Address: Set to the SharePoint site containing the target image file
3.b. File Identifier: Set as per step 2.b

4. Update the Encodian ‘Add Text Watermark to Word‘ action
4.a. Filename: Select the ‘File name with extension‘ property provided by the ‘Get file properties‘ SharePoint action
4.b. File Content: Select the ‘File Content‘ property provided by the ‘Get file content‘ SharePoint action
4.c. Filename: Select the ‘Name‘ property provided by the ‘Get file metadata‘ SharePoint action
4.d. File Content: Select the ‘File Content‘ property provided by the ‘Get file content using path‘ SharePoint action

5. Optionally review the advanced settings to control the image scale and watermark transparency

6. Update the Office 365 Outlook ‘Send an email (V2)‘ action
6.a. To: Select the ‘Email‘ property provided by the SharePoint ‘For a selected file‘ trigger action
6.b. Configure the Subject and Body properties as required
6.c. Click ‘Show advanced options‘

6.d. Attachments Name – 1: Select the ‘Filename‘ property property provided by the Encodian ‘Add Image Watermark to Word‘ action
6.e. Attachments Name – 1: Select the ‘File Content‘ property property provided by the Encodian ‘Add Image Watermark to Word‘ action

7. The flow is now complete and ready for testing

8. Navigate to your SharePoint library to test the flow

9. Post execution of the flow, your email and document attached


Final thoughts…
Hopefully, this post provides a good example of how you can utilise the Encodian ‘Add Text Watermark to Word‘ and ‘Add Image Watermark to Word‘ actions to add watermarks to Microsoft Word documents using Microsoft Power Automate.
We hope you’ve found this guide useful, and as ever, please share any feedback or comments, all welcome!


