Our team are continuing to deliver new capabilities for the Encodian connector; we released the ‘Compare Word Documents‘ action last month, and we’re releasing three further steps this month.
We’re pleased to share the first of these three actions, the Compress PDF action! This new action enables you to reduce the file size of a PDF document, and the advanced options provide the ability to customise the compression configuration to optimise the PDF document produced.
This action is effortless to use, but we also expose a great deal of configuration control. Hence, please remember to experiment, as different documents will respond differently to different compression configurations. Let’s explore!
Compress PDF Documents in SharePoint Online
For this example, I will create a flow connected to a SharePoint library that enables the user to select and compress a PDF document.
1. Within your target SharePoint document library, click ‘Automate’ > ‘Power Automate’ > ‘Create a flow.’

2. Click ‘Show more.‘

3. Select ‘Complete a custom action for the selected file.‘

4. Click ‘Continue.‘

5. Rename the flow; this is also used as the name of the option which will appear in SharePoint

For example:

6. Add the SharePoint ‘Get file content‘ action underneath the ‘Get file properties‘ action
6.a. Site Address: Configure as per the same property of the other SharePoint actions added to the flow upon creation
6.b. File Identifier: Pass the ‘Identifier‘ property from the ‘Get file properties‘ action

You may wish to add some conditional logic at this stage to evaluate the ‘File name with Extension‘ property of the ‘Get file properties‘ action, checking whether the user has provided a PDF document and then acting accordingly, i.e. send an email to the requester explaining the issue.
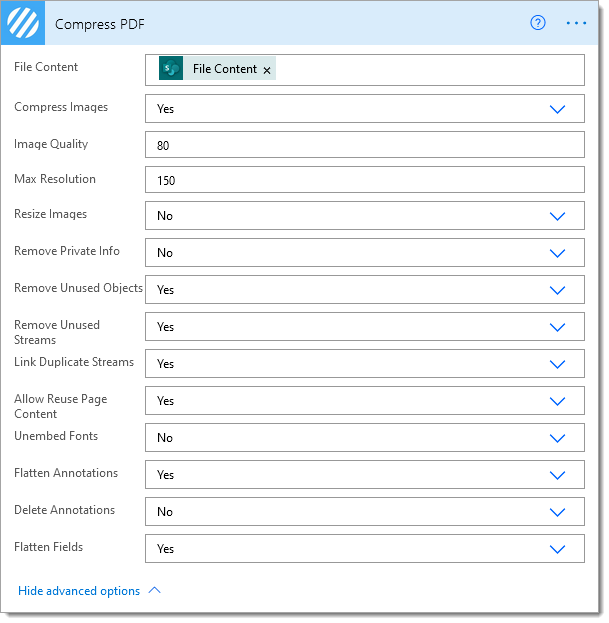
7. Add the Encodian ‘Compress PDF‘ action
7.a. File Content: Pass the ‘File content‘ property from the ‘Get file content‘ action

You may wish to explore the advanced configuration options to customise your compression configuration:

8. Add the SharePoint ‘Update file‘ action
8.a. Site Address: Configure as per the same property on the other SharePoint actions added to the flow on creation
8. b File Identifier: Pass the ‘Identifier‘ property from the ‘Get file properties‘ action
8. c File Content: Pass the ‘File Content‘ property from the Encodian ‘Compress PDF‘ action

The flow is now complete and ready for testing! Save your flow and return to the SharePoint library.
9. Refresh the page!
10. Click ‘Automate’ > ‘Compress a PDF Document’, or whatever you named your flow in step #5

11. Click ‘Continue.‘

12. Click ‘Run flow.‘

Your flow will now execute, and the Encodian action will compress the selected PDF document. You can verify via your new flow’s run history.
It is worth noting that the compression action can take a while to execute, especially for documents with a significant number of container images. Each image will be extracted, processed and inserted into the PDF document, which is computationally expensive.
This example document was reduced from 211k to 81.1k:

The compression ratio can alter dramatically between documents and the configuration applied. We recommend testing and optimising using the advanced options as required.
To share your new flow with your colleagues, follow this post: Prevent API Key prompts in Power Automate for SharePoint Flows.
Final thoughts…
Hopefully, this post provides an excellent example of how you can create SharePoint integrated Power Automate flows to compress PDF documents.
We hope you’ve found this guide useful. As ever, please share any feedback or comments. All are welcome!


1 Comment