Building upon our previous post regarding how to Convert Microsoft Forms Responses to Word or PDF Documents
This week, we had an interesting question asking how to embed image files submitted in a Microsoft Forms response into either a Word or PDF Document created from HTML … hmmm. Whilst we quickly worked this through (and this post covers how), we also identified another scenario which this post also covers:
- Uploading Files provided in a Microsoft Forms response to a SharePoint Library
- Convert a Microsoft Forms response to PDF or Word and embed attached image files.
Uploading Files supplied in a Microsoft Forms response to a SharePoint Library
This post assumes you have already created your Microsoft Form and added a question to allow the responder to attach a file(s) to the response:

1. Launch Power Automate – https://powerautomate.microsoft.com
2. Create a new Flow using the ‘Automated — from blank‘ option

3. Enter a name for the Flow, select the ‘When a new response is submitted‘ Forms trigger, and click ‘Create.‘

The Form I will use for testing contains the following question. Note that I have specified that the user can upload three separate files.

4. Select the target form

5. Add a ‘Get Response Details‘ action
5.a. Form ID: Select the form as per step 4
5. b. Response Id: Select the ‘List of response notifications Response Id‘ from the ‘When a new response is submitted‘ action

6. We now need to test the form as we need an example response (data) to help us to build the remainder of the Flow. Test your Flow and create a reply containing some example files. Once the test has been completed, select the ‘Get response details‘ action

7. Copy the return value (JSON) for the question which contains the uploaded files.

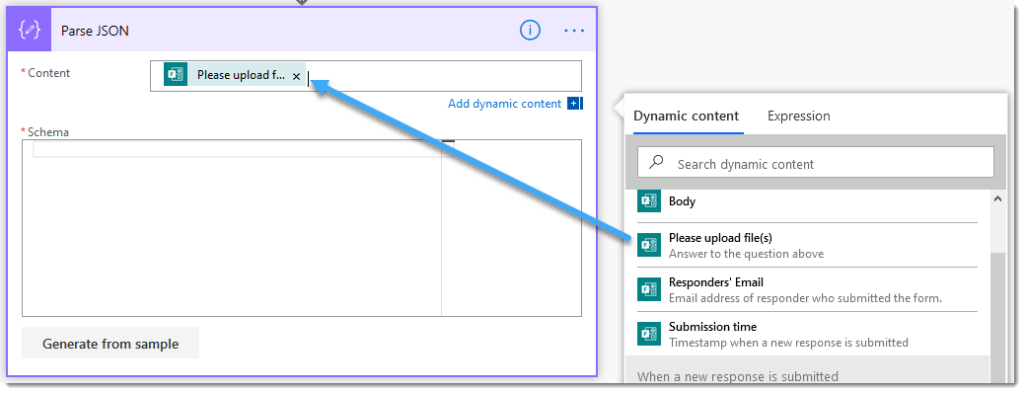
8. Add a ‘Parse JSON‘ action
8.a. Content: Select the question which relates to the value copied in step #7

8.b. Click ‘Generate from sample.‘

8. c. Paste the value copied in step #7, and click ‘Done.‘

8.d. Action configuration complete

When files are uploaded via Microsoft Forms, they are placed into your OneDrive Folder following this convention:
/Apps/Microsoft Forms/<Form name>/Question/
We’re now going to retrieve each file, convert them to PDF and upload them to SharePoint for long-term preservation:
9. Add a OneDrive ‘Get file content using path‘ action
9.a. File Path: Manually enter the directory location where the files will be uploaded

9. b. File Path: Place your cursor at the end of the manually entered path, then select the ‘name‘ property provided by the ‘Parse JSON‘ action

This will automatically place the OneDrive ‘Get file content using path‘ action into an ‘Apply to each‘ loop as the returned value is an array (even if it only contains one file).

10. (Optional) Add an Encodian ‘Convert to PDF‘ action
10.a. Filename: Select the ‘name‘ property provided by the ‘Parse JSON‘ action
10.b. File Content: Select the ‘File content‘ property provided by the ‘Get file content using path‘ action
10.c. PDF Filename: Select the ‘name‘ property provided by the ‘Parse JSON‘ action

11. Add a SharePoint ‘Create File‘ action
11.a. Site Address: Set to the target SharePoint site
11.b. Folder Path: Set to the target SharePoint library and folder
11.c. File Name: Select the ‘Filename‘ field from the ‘Convert to PDF‘ action
11.d. File Content: Select the ‘File Content‘ field from the ‘Convert to PDF‘ action

All done! The documents will now be converted to PDF and uploaded to the selected destination in SharePoint!

Convert a Microsoft Forms response to PDF or Word and embed attached image files
This post is already quite lengthy! So for this specific scenario, please also refer to the following command, which outlines how to convert a Microsoft Forms response into a PDF or Word document: Convert Microsoft Forms Responses to Word or PDF Documents.
For this section, we’ll focus on obtaining an image file and converting it to a dataUri so that it can be embedded into an HTML document. I have configured the form question only to allow a single file to be uploaded. I recommend this approach as it simplifies your Flow when placing images in documents.
1. Repeat steps 1 to 8 in the ‘Uploading Files provided in a Microsoft Forms response to a SharePoint Library‘ section of this post
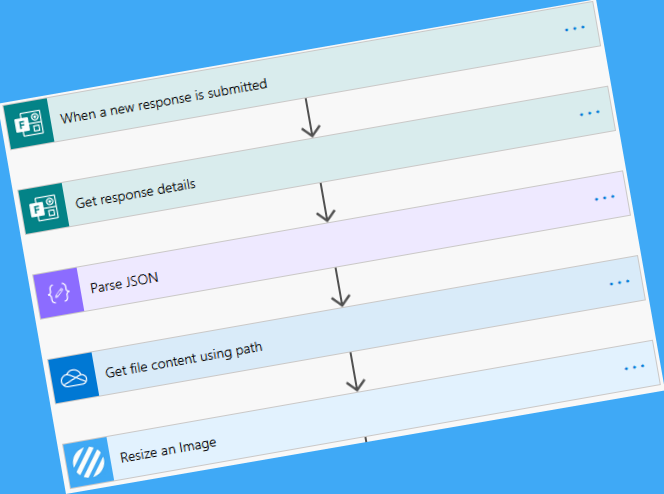
2. Add a OneDrive ‘Get file content using path‘ action
2.a. File Path: Manually enter the directory location where the files will be uploaded

2.b. File Path: Place your cursor at the end of the manually entered text, click ‘Expression‘, enter the following expression, and click ‘OK.‘
first(body('Parse_JSON'))?['name']


The following Encodian action is optional; if added, it will enable you to resize the uploaded image to a specific or percentage size before creating the dataUri for embedding in HTML.
3. (Optional) Add an Encodian ‘Resize an Image‘ Action
3.a. Filename: Enter the following expression
first(body('Parse_JSON'))?['name']
3.b. File Content: Select the ‘File content‘ property provided by the OneDrive ‘Get file content using path‘ action
3.c. Resize Type: Select ‘Percentage‘
3.d. Resize Percentage: Enter ‘50‘

3. Add a ‘Compose‘ action
3.a. Inputs: Click ‘Expression‘, enter one of the following expressions and then click ‘OK.‘
If you added the Encodian action, enter:
dataUri(base64ToBinary(body('Resize_an_Image')?['FileContent']))
If you did not add the Encodian action, enter:
dataUri(body('Get_file_content_using_path'))


All done! The ‘Compose‘ action will return a dataUri which can be used to embed an image inside HTML before conversion to HTML or Word, for example:

Final thoughts…
Hopefully, this post not only provides some good guidance for the specific scenarios covered, but it should also (hopefully) provide some general steps you can adapt and use in your Flow when working with the file(s) provided by a Microsoft Forms response.
We hope you’ve found this guide useful. As ever, please share any feedback or comments; all are welcome!


9 Comments
Hi, thanks for the above guidance, may i ask for your further guidance on – “Uploading Files provided in a Microsoft Forms”, i have been applying the method you shared, and further included the ‘send email notification’, however the attachments (in my test case there are 2 attachments) came in different email, is there any way that i can make the 2 attachments (through the use of ‘get file content using path) go into 1 single email notification?
Hi,
You need to create an arry, add the files to the array and then pass the file array to the Send Email action.
HTH
Jay
Hi,
thanks for the guide, which was very useful for me. But I would like to ask for more guidance: If the upload is not required (=optional) the automation stops while parsing json. Do you have an idea to solve this?
Thanks
Hi, I would suggest adding conditional logic to check there is a value before you try to parse or simply use error handling – https://blog.encodian.com/2019/06/error-handling-in-microsoft-flow/
Your article saved my life. I finally figured out how to send MS Forms responses as email records with attachments. I took what you did minus the PDF conversion and added an array capture that is finally stored in the attachment array field in the Outlook action (borrowed the array stuff from Paul Papanek Stork’s article “Emailing File Attachments from Forms with Power Automate”). Thank you so so much for this.
Glad to hear it help you, thanks for the message 🙂
Hi,
Great tutorial! You said to restrict the file upload to 1, but I need to support multiple uploads. Could you give advice on how I could process these multiple files to html? This makes it far more complex I guess.
Thanks in advance.
It is more complex, you’d just need to update your flow to process each file (a loop) rather than a single file. Please email support@encodian.com if you need further guidance.